During my last post I spoke about proper running mechanics. This post will continue that trend and talk about several easy tests that will determine how much joint mobility an athlete has. Ankle and hip mobility is just as important to runners as proper running form. A mobile ankle will properly absorb much of the impact with the ground, and a mobile hip will help maximize power transfer from the glute and hamstring, which is where most of your running force is generated. Tight hips can also limit your stride and prevent a portion of your backward kick. Having limited joint mobility will not only affect your pace but will also inevitably lead to injury.
Ankle Mobility Test:
 Poor ankle mobility can lead to plantar fasciitis and other lower leg problems. There are two easy tests to check for ankle mobility. These tests are all easily found online, and I’ll list my references at the end of the article. I’ll start with a few technical terms and the normal person equivalent terms. Dorsiflexion is the flexion of the foot anteriorly, AKA the ability to bring your toes up towards you shin bone. It is important for a runner’s foot to be in line with the hip when impacting the ground. To do this, you need to have good dorsiflexion in your foot, especially when running up hill.
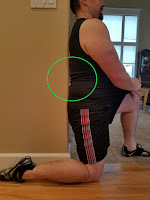
 The test can be done two different ways but if you try both you will find out they both show the same flexion. The first way will allow both ankles to be tested at once. Start by sitting in a chair with bare feet flat on the ground and the knee at ninety degrees. Then slowly slide your bottom forward keeping your feet in the same place (i.e. slouch). If you have trouble getting your knee beyond your toes, then your ankle mobility is limited. A good mobile ankle should allow the knee to go anywhere from four to five inches past the toes before the heel comes off the floor.
 The other way to test is to lay down a measuring tape or ruler starting at the wall and coming towards where you are standing. Kneel, placing one knee and the opposite foot on the floor. The toes of the grounded foot should be at the four- or five-inch mark. Now push the knee forward. The knee should be able to contact the wall without the heel lifting off the ground. Repeat the test with the other leg as you can have different mobility in each ankle.
Hip Mobility Test:
There are also two easy tests for the hips. The hips have multiple muscles all over, but the main two for runners are the hip flexors and the hamstrings. I’m sure some people are thinking that the hamstrings are leg muscles and not hip muscles, but they actually attach at the hips (Ischium tuberosity to be exact).


The hip flexor test is performed with a yard stick, door frame, or wall corner--something to lay the back against. Get down on one knee with your leg extended behind you. The opposite foot should be flat on the floor, and that knee should be at ninety degrees. There should be a small gap between the frame (or whatever you are using as a support) and the lower back (this is a natural curve of the spine). Now rotate your pelvis forward. If your mobility is good, the gap will disappear, and the entire spine will touch the door frame. With poor mobility, the gap will not disappear and there will be a tight stretching feeling in the hip and down the quad (front of the thigh).


The final mobility test is for the hamstrings. This test is nice because it is performed laying on the ground and can be performed with another athlete. While laying face up bring one of the legs up with the knee bent and interlock the fingers behind the knee. The other leg should stay straight on the ground (a slight bend at the knee is natural).


Next slowly straighten the knee of the vertical leg while still holding on. The leg that is still on the ground should stay straight and not start to bend or rise of the ground. This is an indication of good hamstring mobility. Limited hamstring mobility will cause one or multiple things to happen. The vertical leg will not be able to stretch much past forty-five degrees from the floor (in the first raised picture, this would fall in the portion of the box with the red “X”) or will be unable to straighten. If the vertical leg is able to straighten or go past forty-five degrees (anywhere with the green check mark in the box of the first picture), it must do so without the leg on the ground bending or raising off the ground (as seen in the second picture).

As you can see, I need to work on my hamstring mobility a bit.

As you can see, I need to work on my hamstring mobility a bit.
While these tests are informative, they are by no means the end all and be all of mobility tests. These are however a good start to see just how mobile the joints in the legs are. The way to solve these issues are plentiful: stretching, yoga, massage, cross training, taping, or even cupping.
References:
Dicharry, Jay. Anatomy of Running
Barefoot Rehabilitation clinic at http://www.barefootrehab.com/hamstring-stretch-test/
No comments:
Post a Comment